If you’ve ever spied the rings of Saturn or the moons of Jupiter through a telescope, you’ve likely not forgotten the way it made you feel. “Wow! I can actually see that?!”, you might have thought or even said aloud. Although there is much more to see through that same telescope we’re unfortunately encumbered by light pollution and by a set of eyeballs that happen to be particularly abysmal at seeing in the dark.
A Primer to Astrophotography
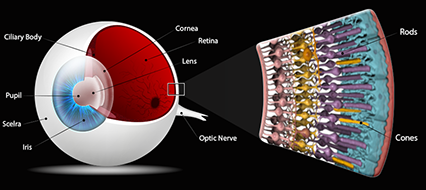
Not unlike the lens of a camera or a telescope, the lens of the eye focuses light onto the retina at the back of the eyeball, which falls onto two major types of cells - rods and cones - carrying electrical impulses to the brain. It is the cones that generate impulses in bright light and provide high resolution and color (photopic vision). The rods, which are ordinarily overstimulated in bright light, are what provide low light vision. However they have poor resolution and are monochromatic. This means our low light vision does not have good clarity or color. Additionally, when looking directly at something, light is focused directly on a small depression on the retina called the fovea - a feature that lacks rod cells and provides the highest resolution image in bright light. The lack of any rods in the fovea means that looking directly at anything in low light will give at best, 20/200 vision. This is why astronomers become used to using "averted vision" - looking at an object with slightly peripheral vision, which makes the object brighter to the eye as light is focused outside the fovea onto rod cells.
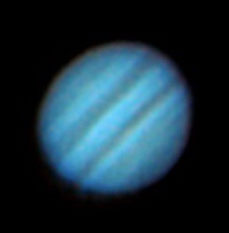
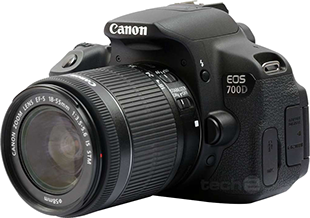


For visual astronomy, this lack of brightness can somewhat be countered by a larger aperture telescope - a larger mirror or lens will gather more light (like a gigantic eyeball) and increase the brightness of an image over the same field of view. One will always be limited by the retina, however. Thankfully, modern technology awards us an alternative in the form of a larger, more sensitive eyeball - a camera! Through the eyepiece of a telescope, even the most simple point-and-shoot or cell phone camera can be used to snap a picture worthy of pride (see Jupiter above). Many of my original astrophotos were taken in this way (it’s called afocal photography). Taking the next step simply requires a slightly better camera - one that can be mounted without the eyepiece or camera lens - allowing the image to be directly deposited onto the camera’s sensor (prime focus photography). A modern DSLR is a capable camera in this regard and many of the photos that are in this gallery were taken with a Canon T5i. Great wide-field shots of the sky and Milky Way can be captured with a good prime lens alone. To narrow the field, swap the lens for a telescope.
Telescope (optical tube) Ease of use $$$
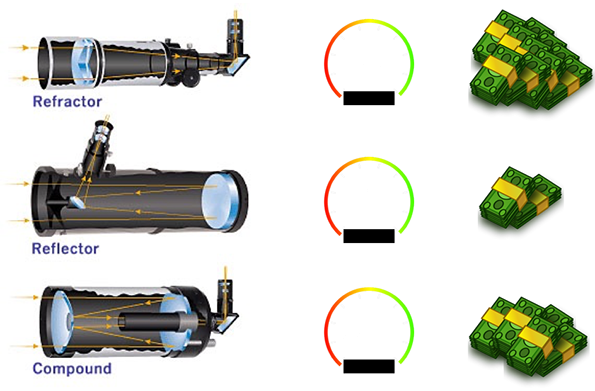
Although there are many different types of telescopes, three major classes are at the heart of most designs - the refractor (lens), reflector (mirror), and the compound or catadioptric (both mirrors and lenses). Having used all three types, I recommend refractors (especially for beginners), despite the price tag, mainly due to low maintenance requirements and good optical quality on even mid-range assemblies. High quality reflectors and catadioptrics can certainly yield excellent results, but generally require more effort and attention. Additionally, the longer focal lengths that typically accompany these designs can also present challenges with photography not unlike trying to take a blur-free image of a distant object with a telephoto lens - the narrow field of view means more demand for a steady rig. There's also that pesky problem of trying to take long exposure pictures from the surface of a planet ...that is rotating!
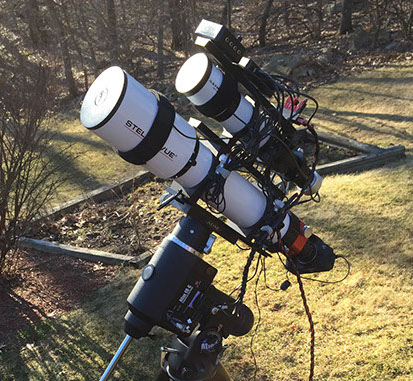
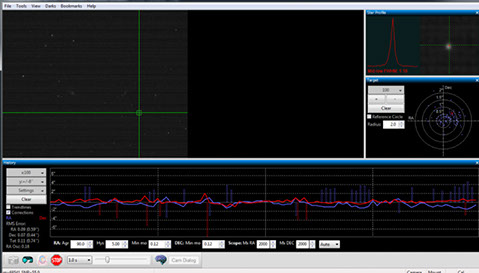
To capture the dim stuff in space, one needs longer exposures and therefore must track the sky as the Earth moves. The telescope mount is arguably the most important part of the astrophotography setup. Even a good quality mount, properly aligned to the Earth’s rotational axis, typically performs well enough for a minute or two without smearing (due to mechanical imperfections in the gearing). With the aid of a second guiding camera, one that tracks the stars, the mount movement can now be corrected to keep a targeted star from moving within a tolerance of just a few pixels. That’s enough to get much longer exposures and explore the dimmer and deeper places in the Universe. The rig above illustrates these components and the guide graph below shows cross-hairs on a guide star (left), the star profile (upper right) and the guide graph with correction pulses sent to the mount (bottom).
MOUNT
IMAGING
TRAIN
GUIDING
TRAIN
<-- to celestial pole
PhD2 Guiding Software - Craig Stark
Light captured by a one shot color (OSC) sensor (like those in most digital cameras) passes through a Bayer matrix, a system of filters over the sensor that sort incoming light into red, green, and blue pixels in order to create a color image (effectively sensing those colors in a spacial dimension on the pixel array). This has the disadvantage of limiting light of a certain wavelength from being detected as only 50% of the sensor area will respond to green and 25% each to red and blue. Typically, longer exposures are necessary to collect enough light in each color to make a deep sky image using these sensors.
Upgrading to a monochrome CCD or CMOS sensor adds a great deal of sensitivity as this allows the entire sensor chip to detect light of a particular wavelength, shortening the exposure time to achieve the same results. This does require that a filter is placed in front of the sensor however, and does increase the cost and complexity of the imaging process.
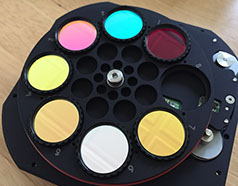
In addition to a common RGB filter set, the separation of different wavelengths of light allows for specialized narrow bandpass filters to be used (see above), which only allow light specific to one element to reach the sensor. Using this technique, one can collect light from different elements separately and then composite them into a color image by assigning those channels to R, G, and B. This process precisely mirrors how pictures are taken with the Hubble Space Telescope, for example, and awards a much greater amount of depth and control over the data in the image. It also enhances the scientific value and potential of the endeavor.
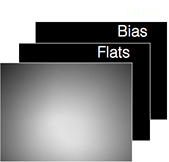
In order to tease as much detail as possible out of the faint objects imaged, a high signal to noise ratio is necessary. There are two ways to achieve this - raising signal or suppressing noise. Depending on the camera technology, boosting signal can mean longer exposures, although this does introduce noise as well, and multiple methods of noise suppression are employed to deal with the many sources of it. Thermal noise is plentiful during long exposures (thermal agitation of electrons on the sensor leads to stray pixel activation) so cooling units are attached to the camera sensor. High-end cameras are able to keep the sensor at a constant temperature, typically -10 to -20 degrees Celsius. Several calibration frames are usually prepared to deal with noise as well as with vignetting (non-uniformity of light across the field) that can occur with optical systems. Residual thermal noise is removed with dark frames taken under the same exposure conditions as the regular lights (the target images) but with the lens cap on so that only noise is collected. Bias frames taken at very short exposures capture sensor patterns and noise, and flats are taken with a uniform bright field (light box or bright sky area) to capture vignetting and sensor non-uniformity. These frames are then used to calibrate the light frames resulting in a much more uniform background and lower noise. Roll over (or click on and off - mobile) the image below to see the uncalibrated and calibrated light frame (watch the background).
The major method used to improve signa-to-noise ratio at this point is stacking. Many calibrated sub-exposures (e.g. 50 x 5 minute images) are combined using software that will detect stars in the images, align each frame to the next using these star positions, then statistically treat the stack such that common pixels are averaged and retained, and noise or pixels that do not occur in the same place in each frame are subtracted. This dramatically increases signal and suppresses noise. This effect can be enhanced with dithering - small movements of each frame relative to the next when imaging (software can handle this via guiding) - which helps to offset noise. The signals are then realigned during stacking. Roll over (or click - mobile) on the images below to see stacking in action!
The fun continues from this point with "post-processing". The stacked image is now "stretched" using various pieces of software such that the dark and light aspects of the image are adjusted to enhance the differences between signal (stars and deep sky objects) and background (empty space). Steps are taken to refine the image in terms of dynamic range, sharpness, noise suppression, and preservation of detail. Ordinarily, this process can take just as long as one might have in exposure time on the object itself (e.g. 10 or more hours of work) and is just as important as gathering good data and calibrating it properly. Post processing also commonly involves incorporating chrominance data (color) into an image and boosting saturation to pleasing levels, which if done well, often adds further depth and structure to an image. Narrowband data would be mapped to particular color channels and combined at this stage as well. Roll over (or click - mobile) the image below to see a timelapse of the more prominent stages of my post-processing on M31, the Andromeda Galaxy.
© 2022 D. Heilman
